


(W180): Dados técnicos de substituição do eixo traseiro
Página 1 de 1
![]()
 (W180): Dados técnicos de substituição do eixo traseiro
![]() por AEP Qua 26 Mar 2014, 18:43
por AEP Qua 26 Mar 2014, 18:43
Fonte: http://www.mbzponton.org/valueadded/maintenance/axle/boot.htm


Underside of chassis with rear axle removed


Created: December 19, 2007 / Jeff Miller
© www.mbzponton.org
Return to the Ponton Workshop page
Return to the Mercedes Ponton page
Rear Axle Solid Boot Replacement
Mercedes-Benz Type W180 220S Ponton Cabriolet
Len Sokoloff / 1959 220S cabriolet / North Carolina
Mercedes-Benz Type W180 220S Ponton Cabriolet
Len Sokoloff / 1959 220S cabriolet / North Carolina
OverviewOne of the common leaks on Mercedes-Benz Pontons comes from a torn or failing rear axle/differential boot. Another common leak point in that area is the pinion seal. In order to pinpoint the leak, you need to clean up the area thoroughly and then check it after a drive to verify where the leak is coming from. In this article, I am going to discuss only the boot repair.
You have three choices when dealing with a leaking rear axle boot:
- You can just let it leak, adding differential fluid every once in awhile.
- You can replace you boot with a split boot as described in the following links:
http://www.mbzponton.org/valueadded/maintenance/splitboot1.htm http://www.mbzponton.org/valueadded/maintenance/splitboot2.htm- Finally, you can install a solid boot as was originally installed when the car was built.
I highly recommend that you consider the following things when deciding whether or not to replace your rear axle boot:
- If you have your fuel tank out of the car for any reason, consider replacing the boot with a split boot if the boot on the car is more than about five years old.
- If you have the rear axle out of the car for some reason, then replace the boot with a solid boot if the current boot is more than five years old or if the current boot is a split boot. Probably the most difficult task in installing a solid boot is removing and reinstalling the rear axle.
If you choose to install a solid boot, you have access to so much more of the rear axle and rear end rubber bits than you do by using a split boot. See the rear axle parts diagram below. With the split boot, you basically only will have access to and be able to replace the boot itself and the two clamps, part numbers 63 and 80. By installing a solid boot, you will be able to assess nearly every part in the diagram except for the internal rear wheel bearings. There are numerous rubber parts that have likely deteriorated over the years and will likely be adversely affecting your ride, your alignment and your tire wear. The parts are not cheap, but if someone is doing this job for you (which I highly recommend), there will be no additional labor cost involved because the parts have to come out anyway.
Mercedes-Benz Catalog C, 1958
Table 22, Rear Axle
Table 22, Rear Axle
Here are the Mercedes part numbers that I needed for this job. You may need to replace additional parts. Since I had already replaced much of the rubber in the rear, I did not need to do it with this job.
- #63 Solid rubber boot – 110 357 04 91
- Smaller clamp – 120 995 04 01
- Larger clamp – 900288 121000
- #100 Rubber mounting/buffer block – 111 350 02 75
- #120 Rubber ring, bottom – 180 351 05 86
- #129 Rubber mounting/bushing – 180 351 00 48
- #90 Four large O-rings – 180 351 09 86
- #89 Copper Shim – 180 351 03 51
Now: on to the Actual JobThe Mercedes-Benz Service Manual Model 190 (SM-1207-000), or the The 2 CD-ROM set Mercedes-Benz STAR Classic Service Manual Library Volume 2 (P-2700-EV2-000) cover the job thoroughly in Job 35-1. Reference the Literature page for detail on the Manual and CD-ROM set.As I mentioned above, I strongly recommend that you have a professional who is familiar with this procedure do the job for you. It is one of the hardest, nastiest jobs that I have ever observed. It is virtually impossible to do without a lift and at least one, preferably more than one, helper is needed. If you have a very well equipped workshop or garage and are comfortable with heavy DIY (do it yourself) jobs, maybe you can attempt it yourself, but for me that is out of the question – just be forewarned.
I took my car to 190SL Services. The owner of 190SL Services, Dave Polny, and two of his technicians (Todd and Don) spent a steady seven hours doing the work. It was impressive to watch real mechanics who knew what they were doing. My goal was to stay out of their way and take the documentation photos for this article. If I helped too much, I am sure the job would have taken a lot longer.
Rear Axle Solid Boot Replacement - Step By Step
1. Drain the differential fluid.2. Remove rear wheels. It was at this point that I decided this was not a DIY job, at least for me.
3. Disconnect drive shaft at the rear universal joint and push the drive shaft forward a few inches.
4. Remove enough of the exhaust system to clear the rear axle.5. Disconnect two rear brakes lines. Wrap the ends with a cloth or tape so that dirt and debris does not get into them.6. Disconnect diagonal link/traversing rod/cross strut link.
7. Disconnect emergency brake on both sides where the single cable splits at the equalizer brackets just forward of the differential. You can see the emergency brake cable in the second drive shaft photo above.8. Remove rear shocks lower bolts (four on each side)9. Remove nut on rear axle pin.
10. Remove top shock nuts and top differential bolt in the trunk. Make sure the rear axle is supported very well.
11. Unbolt front of trailing arms.
12. Before removing spring plates, make sure you note the notch orientation. Remove the shocks and springs. A spring compressor may or may not be needed.13. Raise the car to allow the rear axle to drop.
Underside of chassis with rear axle removed
14. Inspect rubber bits for trailing arms, springs, transverse rod/cross strut link, both differential rubber mounts, etc.15. Remove cap bolt.
16. Drive out the pin that you removed the nut from in step #9. Use a brass punch, being careful of the threads.17. Screw in special tool and drive out the pin. The original Mercedes tool, Assembly Arbor, part # 180 589 08 39, is likely not available, so it may be necessary for a machine shop to fabricate one for you.
18. Remove old clamps and boot and pull off right axle half.
19. Clean up the parts you remove in a parts washer, bead blaster, with brake parts cleaner, etc. If you really want to be neat, repaint the parts you remove with black paint.20. At some point during this job, you ought to also remove and clean up the differential breather.
21. Replace worn or damaged parts. In my case the buffer block and rubber mounting in the differential mount needed to be replaced. There are two bolts that clamp the differential mount around the buffer block that must be removed. A pry bar might also need to be inserted in the split to open up the holding clamp enough to get the buffer block out. I also had to replace a copper shim that the old, worn buffer block had damaged.
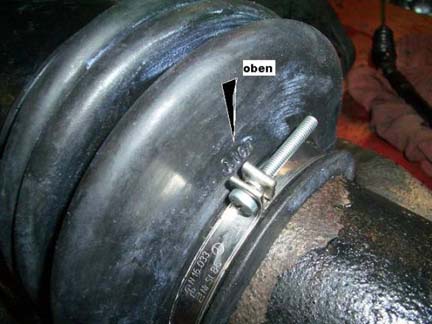
22. Begin reassembly. Even though I want to say that reassembly is the reverse of disassembly, there are some things to watch out for.23. Install new boot and clamps as well as the four big O-rings. Look for the word “oben,” German for “above” and make sure that side of the new boot is “up.”
24. When reinstalling the axle pin, make sure all O-rings and bushings are in place. Make sure pin is oriented properly. It is notched for the splined bolt/pin mentioned in Step #9 to go through. You may need to shine a light into the hole that the splined bolt goes into to verify that the pin is installed properly. This is one of several places in this job that at least one other person is needed to help align the axle while another person tries to pound the pin into place. Use a dead blow hammer for this part of the job.25. Depending on how much help you have and whether you have a lift (DO NOT DO THIS JOB WITHOUT ONE), begin to reattach the axle to the chassis. A second person will be needed to help line up the axle while pushing the top of the differential mount into the trunk. A spring compressor may be needed to compress the springs enough to get them to fit. Reinstall the shocks, reattach the front of the trailing arm and bolt the upper differential mount into place in the trunk.26. Reattach the brake lines and emergency brake.27. Bleed the brakes and refill the differential.28. Breath a big sigh of relief that you were smart enough to let someone else do the job, take the car for a drive and make sure it drives properly and that there are no leaks.Len Sokoloff
December 19, 2007
Created: December 19, 2007 / Jeff Miller
© www.mbzponton.org
Return to the Ponton Workshop page
Return to the Mercedes Ponton page

AEP- Usuário Platina

-
 Mensagens : 17010
Data de inscrição : 05/08/2012
Idade : 50
![]()
![]()
![]()

 Tópicos semelhantes
» (W180): Dados técnicos gerais do eixo traseiro - 220
» (W180): Dados técnicos de instalação/manutenção eixo traseiro
» (W180): Dados técnicos de manutenção/substituição dos pedais de freio e embreagem
» (W180): Dados técnicos do sistema de freio
» (W180): Dados técnicos de manutenção das lâmpadas de pisca
» (W180): Dados técnicos de instalação/manutenção eixo traseiro
» (W180): Dados técnicos de manutenção/substituição dos pedais de freio e embreagem
» (W180): Dados técnicos do sistema de freio
» (W180): Dados técnicos de manutenção das lâmpadas de pisca
Página 1 de 1
Permissões neste sub-fórum
Não podes responder a tópicos|
|
|